

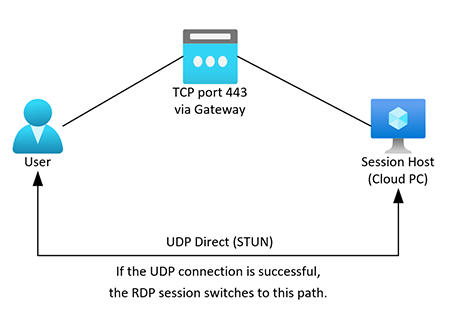
How to Check RDP Shortpath for Public Networks on Azure Virtual Desktop?
If you want to check the RDP Shortpath for Public Networks on Azure Virtual Desktop, you can follow these steps:
-
Validate connectivity to the STUN/TURN endpoints and verify basic UDP functionality by running the executable
avdnettest.exe. You can download the latest version ofavdnettest.exefrom this link:https://learn.microsoft.com/en-us/azure/virtual-desktop/troubleshoot-rdp-shortpath -
Double-click the
avdnettest.exefile, or run it from the command line. -
If the connectivity is successful, the output will show that you have access to TURN servers and your NAT type appears to be 'cone shaped', which means that Shortpath for Public Networks is very likely to work on this host.
-
During the preview, TURN is only available for connections to session hosts in a validation host pool. To configure your host pool as a validation environment, see the article "Define your host pool as a validation environment" on the Microsoft documentation website.
-
If you encounter any errors or issues, check the Log Analytics for error information. Some error titles you may see logged in Log Analytics and what they mean are listed in the article.
Note that using RDP Shortpath for public networks with TURN for Azure Virtual Desktop is currently in preview. Therefore, it is recommended to review the Supplemental Terms of Use for Microsoft Azure Previews for legal terms that apply to Azure features that are in beta, preview, or otherwise not yet released into general availability.
https://learn.microsoft.com/en-us/windows-365/enterprise/rdp-shortpath-public-networks
Environment set to true and type set to Pooled. It also specifies the TURN server list as 192.168.1.100:3478 and 192.168.1.200:3478.
Note: Make sure that your TURN servers are deployed in the same Azure region as your validation host pool.
Once your validation host pool is created, you can check its status using the following command:
az desktopvirtualization hostpool show --name <host-pool-name> --resource-group <resource-group-name>
Replace <host-pool-name> with the name of your validation host pool and <resource-group-name> with the name of the resource group you created earlier
This command will show you the details of your validation host pool, including its status. If the status is "Succeeded", your validation host pool is ready to use for TURN.
Here are the steps to create a validation host using Azure CLI:
First, open the Azure CLI and log in to your Azure account.
Create a resource group in which you want to create your validation host pool.
az group create --name <resource-group-name> --location <location>
Create a validation host pool:
az desktopvirtualization hostpool create --name <host-pool-name> --resource-group <resource-group-name> --location <location> --validation-environment true
Create a host pool registration token:
az desktopvirtualization registrationtoken create --host-pool-name <host-pool-name> --resource-group <resource-group-name> --name <registration-token-name>
Note the registration token value that is returned after running the previous command.
Associate the registration token with the session host:
az desktopvirtualization sessionhost create --name <session-host-name> --host-pool-name <host-pool-name> --resource-group <resource-group-name> --location <location> --registration-token <registration-token-value>
You can repeat this command for each session host you want to add to the validation host pool.
Once you have created your validation host pool, you can use it with TURN for Azure Virtual Desktop.
Here is an example of how to create a validation host pool using the Azure CLI:
Open a command prompt or terminal window and authenticate to your Azure account using the az login command.
Create a resource group for the validation host pool using the az group create command:
az group create --name myResourceGroup --location eastus
Create a virtual network and subnet for the validation host pool using the az network vnet create and az network vnet subnet create commands:
az network vnet create --resource-group myResourceGroup --name myVnet --address-prefix 10.0.0.0/16 --subnet-name mySubnet --subnet-prefix 10.0.0.0/24
az network vnet subnet create --resource-group myResourceGroup --vnet-name myVnet --name myValidationSubnet --address-prefix 10.0.1.0/24
Create a validation host pool using the az desktopvirtualization hostpool create command, specifying the --validation-environment parameter and the subnet ID of the validation subnet created in step 3:
az desktopvirtualization hostpool create --resource-group myResourceGroup --name myValidationHostPool --location eastus --max-session-limit 10 --validation-environment --subnet /subscriptions/<subscription-id>/resourceGroups/myResourceGroup/providers/Microsoft.Network/virtualNetworks/myVnet/subnets/myValidationSubnet
Note: Replace <subscription-id> with your actual subscription ID.
Once the validation host pool is created, you can add session hosts to it using the az desktopvirtualization sessionhost add command.
az desktopvirtualization sessionhost add --resource-group myResourceGroup --host-pool-name myValidationHostPool --name myValidationSessionHost --vm-template /subscriptions/<subscription-id>/resourceGroups/myResourceGroup/providers/Microsoft.Compute/galleries/myImageGallery/images/myImage --admin-username myUsername --admin-password myPassword --domain myDomain.com
Note: Be sure to replace <subscription-id>, myImageGallery, myImage, myUsername, myPassword, and myDomain.com with your actual values.
If you have any questions please feel free to contact us for more information
-
 By Deschaine IT
POML - The Framework That Will...
-
 By Deschaine IT
How to Export and Import Bookm...
-
 By Deschaine IT
Microsoft Teams SlimCore What...
-
 By Deschaine IT
Smishing: How Scammers Use Tex...


.png)